
Hello and welcome to our newest series inspired by our third Podcast (https://stratics.com/interviews/wow-stratics-podcast-3-spotlight-disadvantaged-gamers/) where Metro discusses how simple UI elements can make a world of difference and helps players looking to take their character to the next level do just that. As mentioned in the Podcast, if you aren’t playing with proper Keybinds, Macros, or Addons, you might as well be missing a hand compared to players who are! These guides will be focused on players who already understand the class/spec and are looking to elevate their game to the next level. The experience I have with each spec is almost purely through Challenge Mode dungeons, and can say these design elements can make or break your play and will tell you if / when you are ready for that next step. Let’s get started!
Today we venture into the iniquities of the Protection Warrior Spec and discuss how a few simply, but incredibly useful Weak Auras can do WONDERS to improve your awareness and play overall!
Now let’s start at the bottom and work our way up. The first thing some one like you needs to understand about this spec is that is it NOT the prot warrior from Classic and TBC. By no far stretch are the two even similar, other than names of abilities. Everything back then was about keeping threat and dumping rage to do so. Now, its the exact opposite. All your threat should be managed to keep your self alive, and your CDs will do the rest of the work. The life of a Protection warrior is still very versatile, having options to do INSANE amounts of damage, but sacrifice survivability resource-spending. Both options have their merits, and regardless of which line you walk, this set up will help you do so.
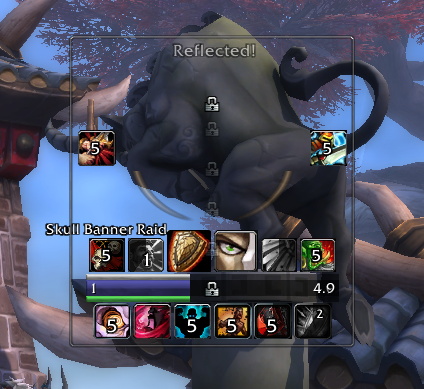
With this in mind, let’s examine the screenshot below.
Click to Enlarge!
You’ll see a lot of action immediately here, but unless you are completely new to the class, it should be pretty obvious what most things are pointing towards. I’d equate this one similar to the Frost Mage guide I published earlier in that its goal is to help you track your many abilities, allowing you to keep your eyes on the more important aspects. Let’s break things down on a macro scale to help you understand each part.
Before we do so, understand that with this set up, it is all part of one big group. Take a moment to read through the description, and return here to import the string once you are comfortable. Once you do, the entire set up will appear as it does in the image above!
Import from Pastebin: http://pastebin.com/eDHxvbSw
Individual Component Explanation –
Main Bar:

If you only pay attention to these icons, you will still be doing a great job. Understanding why is hopefully obvious once you play the class, but if not, let’s walk through it.
On the further left, we see the Skull Banner Icon. Unfortunately, this ability will be removed in 6.0, but until then, its extremely important. The set up details not only the CD and usage of the icon, but WHO in the group or raid dropped it. This is extremely important, as if you have more than 1 warrior in the group, you should regard this as mandatory. Otherwise, expect to be overlapping, and that simply will lead to intense sub-optimization. If you’d like JUST this string for your own set up, feel free to do so.
Skull Banner Single Aura + Raid Member Text: http://pastebin.com/TishvDjV
Next to the skull banner icon, we see the CD and timer for Commanding Shout. This should be used on CD as a rage generator, or saved a few seconds to line up a full rage bar when expecting big damage. If you only ever use it when its on CD, you will still be doing just fine in nearly all content.
In the middle, we see two large icons. These are your Go-to rage generators and have CDs that procs refresh. Because of this, the icons are extremely important, and will flash to alert you of their refreshing. These abilities also need to be used on CD. Avoid saving them, as its very possible you may be wasting another potential proc if you sit on them.
On the right side, the first icon we see is currently Bladestorm’s CD, but has the potential to change dynamically based on which talent you choose. This is incredibly important, as in 5 man content, you NEED to be using Shockwave on CD, or around other diminishing returns. You can also benefit from seeing Bladestorm’s CD so you know when to spin to win!
The final one on the right is the CD and usage of Demo shout. This is essentially your best reduction CD as it reduces all damage taken by mobs within 10 yards by 20 percent. Realize this has to apply to the mobs for it to work, and if you just use it with nothing around, the CD will incur and tick on the aura, but no benefit would have been achieved.
Bottom Bar:
![]()
This bar is simply for your benefit, and will provide a few key timers to help you improve your awareness.
From the left, we see the Enrage icon. Remember, its important to understand that enrage procs from crits of Devastate and Shield Slam, which gives you even more rage and makes you do more damage. A great warrior will use this to his benefit, as riposte gives crit, crit gives enrage, and enrage gives rage + damage. Maximizing this can lead to you doing millions of damage, all while easily staying alive with rolling block and shields.
Next is the Second Wind icon, simply to indicate when it is healing you. This means you are low health, so it doubles as a health indicator.
Third from the left is the CD and usage for Rallying Cry, followed by its partner Last Stand. Just another cd tracker, so pay attention to it!
Second on the right is the Recklessness usage and CD, once again as basic as it gets. Just for your benefit of knowing! The more you play this character though, the better you’ll get at understanding exactly when you doing damage is good for the group.
Final one on that line is for Shield Block, a useful icon that helps you know when the usage is expired or available again.
Rage + Bar:
![]()
This one is a bit less obvious, so let’s delve into what we are seeing here.
First of all, this is four auras put into one small area for your benefit. There are three colored bars total, but you only see 3, for a specific reason.
The easiest to identify immediately is the White bar at the top. This shows the duration of your Block coming from Shield Block usage, and will help you manage your down time around it. Pretty easy to lose track of, and if you never do this, don’t feel you are letting anyone down. Just a level of optimization that can go a long way if noticed.
On the bottom, we then see the Green bar. This is your vengeance, and will help you track how much you have. This is also a level of optimization most players won’t conceive, and without much loss. It can help if you use it to your advantage though, thus it is there.
Now in the middle there are two bars. In the image, you see the Blue bar, which is the amount of your Shield Barrier ability. When not active, the bar is Red, and indicates your rage. The goal is, to never see it red! The reasoning behind this, is typically, you want to use rage on Barrier constantly, so in a time of burst damage and incoming damage, you simply keep it rolling. In the few seconds the absorb lasts, you can build enough rage for another supplement. Not only does this track the numbers and progress, but it gives an amazing visual indicator to help you know when you are doing things well. This is one of the finer points to mitigation as a warrior, so if you are struggling to keep spikey damage down, get better acquainted with this mechanic and Weak Aura.
Extra Procs:
These featured are regarded as a catch-all wrap up of other procs that might not fit elsewhere. The one on the left of center is to track Impeding Victory or Victory Rush. Extremely useful in 5 man content where there are lots of adds!
On the far right, you see Ultimatum proc, which helps you track and understand when to use your free Heroic Strike or Cleave. Should be looked at as free damage, no point in passing it up!
In the middle / bottom, you see the Meta gem proc. This can be pretty useful to track, but if you do not possess it, it simply will never appear.
Finally, the top of the image portrays the word “Reflected”. This helps indicate when you successfully reflect a spell with Spell Reflection. Can be very useful, if only for peice of mind. One area it immediately comes to mind for is the first pull in Shado-pan Monestary Challenge Mode. You can reflect the stun they do! What a great feeling that is!
Level 30 Healing Talent Discussion:
One final thing that we should discuss before we go our separate ways is the different options in this tier. Many people see Second Wind as mandatory, and others see it as useless, but I’ll explain the pros and cons of both sides, and weigh the choices that remain.
Its actually quite simple, at least in my eyes! Second Wind is a raid talent purely. In raids, its really not uncommon for the tank to sit at 50 percent or lower heath, often dropping even lower to 30 percent. Second Wind can very often save the life of the tank, without any effort put in.
However, in 5 man content, this should be quite the opposite. Especially in Challenge Modes, if you are that low, you are either dead, or saved back to full immediately. There is no spread healing, so every second you should receive attention. From my personal experience, I have never once been that low that I couldn’t immediately heal my self back up with Impending Victory, or could of survived no matter what healing I had. Because CD usage is much more preventative than reactionary, I find no need for Second Wind in Challenge mode or smaller group content.
Its then down to Enraged Regen and Impending Victory. I choose IV because of its ability to be used as an on demand heal on a moderate CD, something warriors need very badly. You’ll find it really useful when doing Challenge Modes, especially on bosses. The spell turns into another reliable defensive CD, much like a Paladin would have!
Enraged Regeneration is quite useless to me, at least from what I’ve seen. Its strength is the potential 20 percent regeneration over time after the intial, but once again, you either need the healing now or death, or you are over healing with this. The only time I can see it useful is in 25 man heroic raiding, but once again, Second Wind gets my vote there because of massive health pools and saving power without button usage.
Well that’s everything, so if you have any questions, feel free to leave them in the forum attached to this topic, or contact me in game.
As always, I am not fluent in the program, and usually find people who ARE fluent and modify their work. This Aura string was devised by a brilliant person and moderator over at MMOchampion, known as Clampy. I encourage you guys to check out his thread on the topic and let him know you were referred to him by Metro from WoW Stratics!
It’s important to remember that you are the best person to help yourself improve, but with tools and help from those already experienced you can transform yourself into a top-tier player near instantly.
Discuss this Topic at:
Stratics Forums Thread!
See the set-up in action:
Youtube Video!
Check out my Warrior’s Armory:
http://us.battle.net/wow/en/character/firetree/Precussion/advanced
Download Weak Auras Two:
http://www.curse.com/addons/wow/weakauras-2

Recent Comments