
Zones in Wrath of Heroes are areas of a map that give advantages to certain teams fighting within them based on the location and status of objectives. The theory is based on predictions of where an enemy team is located based on the status of objectives. This post is only about map zones. Heroes also create zones of their own used to determine correct positioning in team fights, but that’s something that can be done later.
Map zones have three states: controlled, contested, and deadly. These zones are calculated independently for each team. A controlled zone is area of the map that clearly favors one team over the other two. A contested zone is an area that has two teams on equal ground, but highly disfavors the third team. A deadly zone is an area of the map that is controlled by another team or is not contested by the team.
The zone states can also be expressed by the chance of favorable point gain by fighting in a particular area. Controlled zones highly favor a team gaining more points there than giving up points to an enemy. Contested zones put the team on equal chance of gaining points with one or both other teams. Deadly zones are likely to have a team giving up more points than gaining.
A team in a deadly zone is likely going to be flanked and killed for being out of position. One only has to watch any match on YouTube to see this. One could also try going into a deadly zone in game to see this firsthand. Don’t say we didn’t warn you.
A zone can also be static or dynamic. Static zones in Wrath of Heroes are defined by the placement of warcamps and dynamic zones change based on the status of objectives.
Let’s look at Mourkain Temple.

This is how the map looks at the start of the match. Let’s draw the static zones on the map.
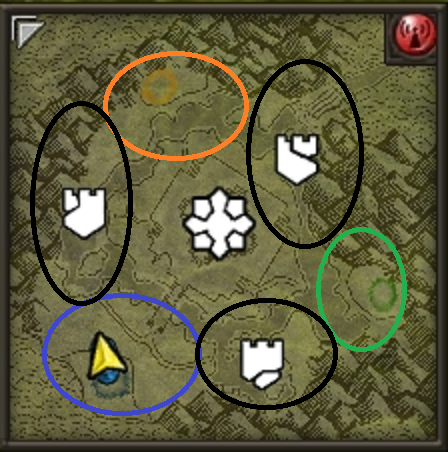
Team colors represent controlled zones and the black circles represent contested. The outer flags are always contested by the two teams whose warcamps are adjacent to them. The flag opposite a team’s warcamp between the opposing teams’ warcamps is always deadly since the opposing teams can respawn and get back into the fight there a lot quicker than the team that doesn’t have an adjacent warcamp.
The artifact has its own zone encompassing the entire temple platform. Its status is dependent on the status of the outer flags. The artifact is controlled by a team if they have a flag and no other team does. The artifact is contested when a team owns a flag and one or both other teams also have a flag. The artifact is deadly when the team has no flags.
The reason the artifact is deadly without a flag is you can’t capture the artifact without a flag, and the other teams will likely have a flag before rushing into the artifact. Flags increase the value of kills made by a team, so kills being equal, being in the middle without a flag will put your team at a point deficit.
A team owning the artifact contests all three outer flags since moving from the artifact to a flag is very quick.
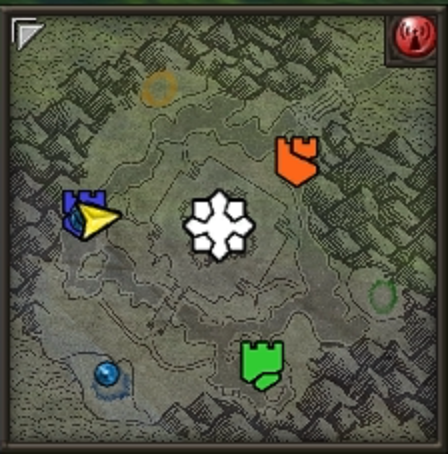
This is common at the start of a match. All teams have a flag, meaning all teams contest the artifact. The reason is happens is all characters spawn into Mourkain Temple looking to their left. If you want a quick fight, you can usually find it by going right after the match starts.
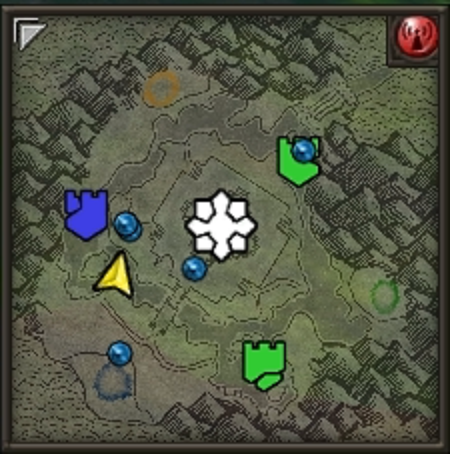
In this next example, Orange has lost the ability to contest the artifact, so it’s now deadly to Orange and still contested by Green and Blue. Please ignore my idiot teammate trying to capture the flag opposite our flag. He was killed shortly after this screenshot was taken.
Let’s say Orange takes the artifact making the map look like this. Which flag should Green try to go take? Assume Green is at their spawn and they do not know Blue is at South Flag.
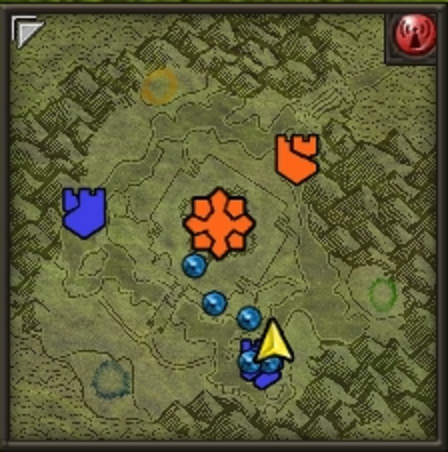
Orange can contest all flags since they control the artifact. (Note it’s still deadly for them to actually move to South Flag since they’d be caught between both enemy respawns.) Blue can also contest the South Flag by placement of their warcamp. Blue cannot safely contest the East Flag. Green has the best chance at the East Flag. As a bonus, this will also uncap the artifact.
These zones assume that a team does not know where the enemy teams are at any given time. If a team does know where they are, then the zones change based on that information. This is called vision.
There are three ways to gain vision on the enemy. The first one is seeing the movement or position visually. The second is given when a objective changes ownership on the map. The third is by watching the kill tracker.
The easiest example is at the start of a match. One team takes a flag uncontested, the other two flags are not captured and the kill tracker starts showing kills. The other two teams are fighting near the objective between their warcamps.
For another example, take the last map shown. Let’s say that Green saw Orange move to defend the East Flag. Green also saw Blue moving to the South Flag. The artifact uncaps a second later. This means there’s at least one Blue at the artifact trying to cap it. Green should immediately push the South Flag knowing that Orange isn’t there and that Blue is down at least 1 at the South Flag.
Follow the suggestions here and you’ll find that you won’t be flanked and killed nearly as much.
Want to see this in action? Watch this. http://youtu.be/r4gdw5cCOcY

Recent Comments