
Welcome to Metro’s 25 man Heroic Healing guides for the Siege of Orgrimmar! It is important to understand that these guides are first aimed at helping healers understand their role, and then helping them maximize their play. Each will feature a general overview of the mechanics that matter to the healers, and conclude with a class-specific discussion. Let’s begin!

Understanding the encounter –
As alluded to in the Malorok guide, you now stand before the third of the true healing challenges in Siege of Orgrimmar. This fight is purely the most exhilarating, and quite a contrast from the others, as you will see 25 people face death every second for about 45 seconds multiple times throughout the encounter.
In order to understand the strategy, you need to understand that everything this fight is, was, or ever will be, can be weighed against your level of strategy and preparation. Some guilds favor this and some despise it, but unfortunately without proper coordination and pre-determined rotation of abilities, you will not complete this encounter.
You also will need to set up world markers to show you exactly where is safe from the yeti’s charge, and hopefully your raiders do the rest there. It’s also important the run the dinosaur flawlessly, and if there is any hiccup along the way it will result in the dinosaur in sub-optimal position, which can dramatically effect healing and the dps requirement as well.
The last phase is purely a scramble, so if you can’t beat the soft enrage of him speeding up, you’ll need to implement more stacks in other phases.
Understanding the Healer’s Role –
The healing role on this encounter is very much the role of a foot soldier in a grand campaign. Your job is to perform your abilities at PRECISELY the correct time, and use them well. There is nothing else to this fight as a healer, and if you all do your jobs perfectly, things will go flawlessly. If you do not, you have no hope of completing the encounter.
We will use our set of cooldowns as a guideline for explaining how you should organize yours, and I will explain each decision specifically.
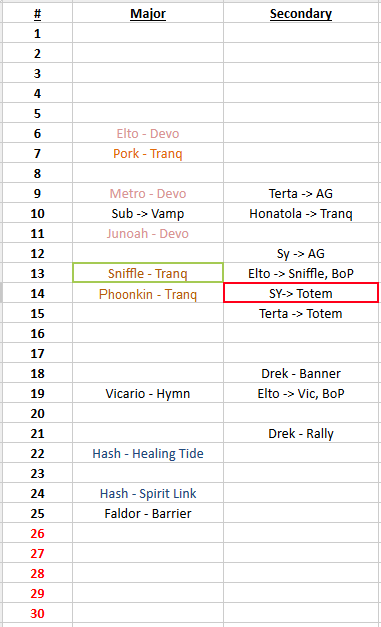
Click to Enlarge.
The image seen here is the set-up we use for our first stack. The black numbers indicate each screech, and the red indicate the ones we are pressing through to end. We 7 heal this currently, but have tried 8 healing, and would suggest the same if you are struggling, especially if the 8th addition is a Shaman, Druid, or Priest. Also, if you don’t already have at least 2 paladins, this fight will be incredibly difficult. The more paladins the better, so if you have someone on the bench who isn’t necessarily in the raid, you will likely need them for this one, as Devotion aura will carry. It will make the enrage a non-factor, and will make the healing requirement much easier. If you could have 7-8 devo auras, you probably wouldn’t even need a CD rotation.
Let’s start by explaining each major CD usage, and why it’s being used there. We take 5 hits without any real CDs past healthstones and personals – something that any group should be able to replicate with 7/8 healers. From here, our first CD is Devo. The goal for the three paladins is to chain them back to back to create a 15 second window where all DPS can continue to go nuts. You notice 15 seconds, because it’s important to pop the subsequent when the previous is as 1 second, not 0. If for any reason you lag out or miss time it, people will get interrupted and it has the potential of clipping a major CD or disrupting DPS in a way that they never get comfortable again.
During the Devo’s we make use of 1 major CD and a few minor. Pork is a Restoration Druid, and we have his tranq used first to stabilize, but if you are short of on-demand throughput, you can probably get away without a major CD and just spam your best AOE heal through the Devo blanket. After the tranq ends, we have our Elemental Shaman use Ancestral Guidance (AG), as it’s based on damage he deals, so otherwise useless later.
The next combination is my Devo as Elto’s ends, coupled with a Glyphed Vampiric Embrace from our Shadow Priest, and Tranquility + Heart of the Wild from our Tank Druid. Our final Devo comes up as mine goes down, and with it, we use Syiler’s AG and blow our final big AOE heals.
From here, things get heavy, so we stack two Tranqs on top of each other. This is where Hand of Protection (BoP) comes in and is the reason you want to bring at least 3 paladins, otherwise you won’t have enough for when you need it. Sniffle, a Restoration Druid, gets the first and uses his Tranquility 1 screech after the Devo ends. Phoonkin, a Bombkin, gets also uses his tranq+<3, but does not need a BoP, as he is using Symbiosis on our Warlock, granting Unending Resolve.
Once the Tranqs are over we try to buffer 3 or 4 screeches with 1m personals, Healing Tide Totems from Syiler and Terta (DPS shaman), and Drekrar’s Demo Banner. Soon after, the second BoP goes to our Holy Priest Vicario and he uses Divine Hymn.
Coming down the home stretch, we see a Rallying Cry from Drek, and Healing Tide from Hash, a Restoration Shaman. This is where things get tricky, and can be the reason you hit the enrage or not.
Around the 24th hit, we drop Spirit Link in the middle of both groups, and collapse at the 25th. Faldor, a Discipline priest, uses his Bubble on top of the totem, as well as another round of personals if available. The goal here is to not heal, but sit in these reduction CDs and ride out the last 4 screeches. Every time we have attempted this, it works so that we are stacked for the 26th, and the CDs don’t break until the 29th. On the 30th, we take the massive damage needed to enter bloodrage, and not a moment too soon, as if you reach a 31st hit the fight ends.
Meta-Strategy For the Remainder –
At this point, you simply run to where you are supposed to be with the Jailer, and regen mana. Heal when needed, but as long as the run is handled properly, this is AFK phase until you go back into the Screeches and stacks.
Now that you understand our strategy and rotation, you can employ your own where needed. I will use the rest of this article to discuss where the fight takes us from here and how you should handle it as healers.
The next time you see screeches, you will quickly realize your CDs are not back up for when you would need them. It is because of this, we have elected to end this phase early. We take 4 hits, then stack for the 5th and use 1 min cds + Personals. This rides us through the 5th hit, and the 6th will push the blood rage. Run the dino around, and then get ready for another main sequence.
The third time you see the screeches will be the most volatile, as it should be the time you get the bats. These bats present an interesting complication, as not only do they do damage, but they need to be killed ASAP. It is for this reason that we push all our CDs forward to blanket Devo over the window we need to take down the bats. If we did not do this, ranged DPS on them would be extremely weak and they would heal for more than was incoming.

You will see that everything is just moved up, but the marker for starting is when the bats are in the prime location. I try to urge the Devo to start around the 4th screech instead of the 3rd, to push out a few extra seconds of DPS time, but this is not always possible.
At this point, we are using the Devo to help the DPS, not the healers, and once the bats are dead things can resume as normal.
The other issue that needs to be made apparent is the poison debuffs happening throughout the entirety of the green door. It is simply not possible to dispel them all normally, and I really don’t know why they thought that mechanic was a good idea, as is mandates priests in the raid. Regardless, the only option is Mass Dispel, and luckily we have three, will go out during the Devo.
Around the 20th we collapse under the Spirit Link and Barrier as described earlier and ride out as many as possible, usually breaking around the 25th or 26th.
From here, another run phase and the final screech phase will take place with fire crowding the dance floor. With fire, we choose to stay spread for two stacks, then collapse under whatever we have left and heal through it as long as we can. There is no set order or strategy, and are officially forsaking order for the will of entropy, allowing the dino to phase on final time.
The Scramble –
The truest descriptor I can conjure for this phase, we call it the Scramble because we let the dino push and chase people until it dies. This is not what most groups would recommend, but I find it much simpler and provided you have the DPS, it negates the actual enrage. If he DOES hit the enrage here, you can continue to run around, while if he enrages in the screech phase, they will just one-shot the whole raid.
At this point, it’s the healers job to do as much DPS as possible, and patch everyone up who needs it. Use whatever you have available to make this happen, and as big CDs come back up, pop them. Devos and the early Tranqs used should go out ASAP. Prioritize ranged DPS over melee, as most melee will barely be able to get a global in while dodging the fire and chasing the dino.
Either way, if you make it this far, you will know the fight is over. Take a moment to bask in the true irony this fight presents. It starts off being a meticulously detailed formula, planned down to the very second. It completes with 25 people running around like loons, a yeti smashing into half of them, and a dinosaur chasing 1 man at the speed of light.
Enjoy it my friends, as it is the true pinnacle of 25 man Heroic Healing, and may be the last time we ever see 7-8 healing CD coordination on this level with Mythic around the corner. It is without question my favorite encounter to heal in this video game, and gets me emotional just thinking about it as so, knowing what the expansion holds.
Class Specific Tips –
Holy Paladin: You are the king of utility here. Clemency BoP, and Devo Aura make the fight possible. Ret and Prot can do the same, with equal efficacy. Throughput probably the weakest, unfortunately. Be sure to use CDs chained with Light’s hammer, and in the Devo blanket. Also, use Bubble aggressively as another smalling healing surge. Cautious of the tank, and there is little casting happening towards the end, beacon will not be enough at times. Time Light’s Hammer with the bats to double triple dip damage on Thok, Bats, and healing on the raid.
Resto Shaman: Best throughput without question. Healing Rain and Chain heal reign supreme, as well as 2p Earth Shield on the tank. Healing Tide as good, if not better than Tranq and Hymn, and Spirit Link is hilariously OP on this fight, as it will ensure your health never goes below 50 while it’s active. Use this as a buffer at the end.
Resto Druid: Tranquility is carry-mode. Efflorescent mushrooms and hots will do work as well. Time Wild Growth after a screech to see crazy numbers.
Holy / Disp priest: Divine Hymn will carry early, and Bubble will carry if stacked. Bubble hard to use, as its too small to reach both stack points. Spirit Shell can negate a large portion of a screech, time with Devo. Mass Dispel is mandatory unfortunately. Divine Star can double and triple dip with bats and generally is ridiculous healing.
Misty Monk: (Do not currently have a monk healer in our progression.) Revival OVERPOWERED for poision phase. Use it towards the end when no Mass Dispels are available, clearing upwards of 15-20 debuffs!! Fistweaving and passive AOE likely make Monk an ideal candidate as well. Can Zen Med to block some damage on one, or use during Devo to cover multiple.

Staring contest with Thok is not the best plan!
TLDR Recap –
Unfortunately, there is no easy way to prepare for this encounter, or a short version of the strategy. The strategy, especially as healers, requires outside-the-raid preparation, and I would recommend your leadership create a live-form spreadsheet as we did. You can edit it as you progress and everyone will see any changes you make as you make them.
Otherwise, the best advice I can give you is use your CDs at exactly the same time every single attempt. The more you do it, the more muscle memory that part will become, and it will allow you to focus on min/maxing other areas, or even DPS.
As always, this guide is from the perspective of a Holy Paladin in 25 man heroic raid leadership perspective. Experience is limited when it comes to priest and monk healers, so if you have input feel free to join the conversation! Otherwise, if you have any questions feel free to ask! Enjoy SoO!
If you would like to see our kill, check out
http://www.youtube.com/watch?v=TNYFKv2uLQI
Recent Comments