
Hello and welcome to our newest series inspired by our third Podcast (https://stratics.com/interviews/wow-stratics-podcast-3-spotlight-disadvantaged-gamers/) where Metro discusses how simple UI elements can make a world of difference and helps players looking to take their character to the next level do just that. As mentioned in the Podcast, if you aren’t playing with proper Keybinds, Macros, or Addons, you might as well be missing a hand compared to players who are! These guides will be focused on players who already understand the class/spec and are looking to elevate their game to the next level. The experience I have with each spec is almost purely through Challenge Mode dungeons, and can say these design elements can make or break your play and will tell you if / when you are ready for that next step. Let’s get started!
Today we will examine Restoration Druid and show how a few simple indicators can take your play from moderate to exceptional.
To understand Druid is to know that your most powerful healing is done over time and on the move. While it typically a cliche to “set it and forget it” this is VERY much the case, especially in large group content. It can easily be said that a druid who uses things like Rejuvenation and Wild Growth with nothing else can do a fine job in 25 man raiding, but when we delve into 5 man content such as Challenge Modes, or even 10 man progression raiding, you won’t be able to just sit around and toss hots at players!
With this in mind, let’s examine the screenshot below.
Click to Enlarge!
In this screenshot you will see multiple spells and timers, all aiming to take the guess work out of the Restoration Druid spec. In this article, we will discuss the individual contributors, and break down each section piece by piece.
Main Cooldown Tracker
As a Restoration Druid, especially in 5 man challenge mode content, or even raiding, its extremely important to maximize Tree of Life, Ironbark, and Innervate. As per usual, I will preach that having a visual indicator on the screen should reliably help control their usage, and with a ticking CD, you will know exactly when they become available. If you are doing progression raiding, this will help your brain recognize patterns through out the encounter, and eventually you will be able to judge time without looking at a clock or timer, just because you know how often you are able to use your abilities. If there is one thing that’s important about 25 man heroic progression, its this aforementioned level of understanding and optimization. Lets’ examine the screen shot below and discuss exactly what you are seeing here.

You will immediately notice two rows, and some variety in each. Beginning with the top left, we see Ironbark. This is a simple visual indicator to help plays recognize the spells availability. When its available, its on the screen. When its not, its gone, to help prevent clutter. With a 1 minute cooldown, this should be something that you can get used to using consistently, with a helpful reminder from our friend Mr. Aura 😀
Next to Ironbark, still on the top row, we have the same type of indicator for Innervate. The icon will be present when the spell is available and disappear when its not. This one is even more vital, and should help you get into a habit of using it early and often. Its by-in-large the main reason Restoration Druid can spend mana as much as they can without worry.
Jumping now to the bottom row, we see both Battle Rez and Barkskin. These should be regarded as personal trackers, and will give you an immediate indication whether you can battle rez a dead player or pop a CD to survive some predictable damage. They will both operate the same as the two discussed previous, and with Barkskin being only a 45 second cooldown, its easy to forget about. With these auras, you won’t have to worry!
The final four spaces remaining are the most important. With this in mind, we have two separate trackers for each. On the bottom we have an indicator for its availability like before. This will tell you its usable, and after you use it, the icon will shift to the top row and tell you the remaining CD. This is extremely important for both these spells as knowing exactly when they come up can mean life or death for your raid team. In challenge mode content, Tree of Life is your most important CD, so once again, not knowing its exact CD can be the reason your tank dies or lives.
You can find this Weak Aura string here!
Minor CD Group
Its not uncommon for healers best spells to have small CDs, and that is certainly the case with Swiftmend and Wild Growth. Without a doubt, the go-to instant single target heal and aoe heal, and arguably the best in the game, especially when examining heal per mana. Originally, I attempted to operate these spells on the same mental clock I discussed earlier, but the facts are that they are just too short a CD for my brain to wrap itself around so I was constantly having to check and see when they were available, or be trying to cast them when they were still on CD. With these strings, you will see that problem dissipate, and you will gain a better understanding of when to use each spell. Let’s check out the image below and discuss what else we see.

As mentioned, you will recognize the Swiftmend and Wild Growth icons. You can see their CDs will appear when applicable, but the icon will disappear when otherwise. This is something I prefer, as it helps me realize that if there isn’t an icon always there, I am mismanaging these abilities. They are ALWAYS worth using. Maybe hold on to them for a second or two, but the blank void should scream at you that you have amazing heal per mana spells with an instant cast just sitting there waiting to be used.
Now the final one may take you somewhat by surprise, but I will explain why its there and what its used for. First of all, if you don’t recognize the icon, its for Cenarion Ward. It operates the same way the other two do, so if you don’t have it talented, it will simply never appear. When it is talented, it should ring loudly as the other two did when there is that empty space where its timer should be. This should be your best tank heal and IMO rivals Earth Shield (without the set bonus) and even Beacon to some degree. Having another hot is never a bad thing, but of course ysera’s gift can really be strong in most cases. Let’s discuss why you SHOULD NOT use it in Challenge Modes though!
Ysera’s Gift vs. Cenarion Ward
Ysera’s Gift is an amazing ability in raiding, especially 25 man heroic progression. On a fight like Malkorok, where people constantly need healing anyway, this spell will dominate. Its a no-brainer really! But, in Challenge Modes, it will be quite the opposite, and for reasons you may not predict.
The spell is essentially a ticking threat modifier! Of course, any AOE threat anyone else does will over ride it, but there will be a lot of cases where your tank will want to pull mobs quickly and gather them all up, and THEN do threat. With ysera’s gift constantly ticking, you will be the number one on the threat table while these situations arise, and thus destroy the well laid plans of your tank. Especially since its uncontrollable, this is a real big issue. The biggest example of where this will destroy you is the Shado-pan mount skip. Some people employ a controlled wipe, where you simply run allll the way from the second to the third boss, but if you have ysera’s gift on, all the mobs will focus you 100 percent of the time, and you will get all the debuffs, get sha-punched, and die before you get half way there.
Couple that with the fact that “Your most nearby injured ally” will likely NEVER be the tank, and this spell is really useless. Its strength comes with the high healthpool and high demand for aoe smart healing 25 man heroic progression demands, but is weak here, and neat unusable because of the threat issues it presents.
So I’m not saying Cenarion Ward is amazing, or even better in most situations. But it is a reliable hot for the tank, who always needs healing, and can be controlled. Make use of this spell, and its associated weak aura.
You can find the minor CD string here!
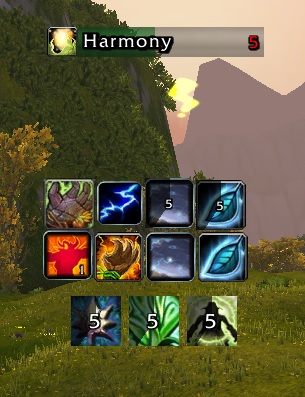
Harmony!
The Restoration Druid Passive that has been the subject of much debate is known as Harmony. Whatever your take on this mastery, understand this much. The usage of it dramatically increases the healing Regrowth does, and keeping it active in small group content like Challenge Modes is default, so it makes your hots that much more effective. That’s all you need to know for now, because thats the important part. When you are spamming Regrowth as your primary ability, it doesn’t matter if you like the passive or not. Its active all the time, so its effectively a full-time passive buff!
Of course, in actual raiding, you can’t afford this type of spending. You will need something to track its usage so you aren’t just haphazardly casting spells to try and meta-game your hots. And boy do I have just the thing to do it!

Harmony not Active!

Harmony Active, with remaining Duration!
These two are pretty self-explanatory, but to be brief, the yellow symbol will be your alert to its non-activity, and the green bar will tick its duration before you need to cast again, should you wish to keep it up.
Both of these are individual, so if you don’t feel you need either, don’t feel obliged.
The Yellow activity indicator can be found here!
And the Green duration tracker can be found here!
Other Remarks
Now that you have all these tools, you should feel well equipped. The only thing other than these that you will need to monitor is your hots and their duration on the target, especially Lifebloom. For me, this is done via Healbot, and is by default. Hopefully you are choosing to equip yourself with a clickthrough addon such as Healbot or Vuhdo, and if you are, it should be defaulted. If not, you should really consider it. Otherwise, you’ll have to find another way to monitor your hots!
Well that’s everything, so if you have any questions, feel free to leave them in the forum attached to this topic, or contact me in game.
As always, I am not fluent in the program, and usually find people who ARE fluent and modify their work. The original source of this came from searching the internet and finding multiple threads discussing this topic. I then pieced them together and placed them in a comfortable spot for my playstyle!
It’s important to remember that you are the best person to help yourself improve, but with tools and help from those already experienced you can transform yourself into a top-tier player near instantly.
Discuss this Topic at:
https://wordpress.ravenant.com/community/threads/restoration-weak-aura-set-up.314517/
See the set-up in action:
Youtube Video!
Check out my Druid’s Armory:
http://us.battle.net/wow/en/character/firetree/metrohehe/simple
Download Weak Auras Two:
http://www.curse.com/addons/wow/weakauras-2
Recent Comments