
Hello and welcome to our newest series inspired by our third Podcast (https://stratics.com/interviews/wow-stratics-podcast-3-spotlight-disadvantaged-gamers/) where Metro discusses how simple UI elements can make a world of difference and helps players looking to take their character to the next level do just that. As mentioned in the Podcast, if you aren’t playing with proper Keybinds, Macros, or Addons, you might as well be missing a hand compared to players who are! These guides will be focused on players who already understand the class/spec and are looking to elevate their game to the next level. The experience I have with each spec is almost purely through Challenge Mode dungeons, and can say these design elements can make or break your play and will tell you if / when you are ready for that next step. Let’s get started!
Today we will be looking at Brewmaster Monk, the latest tanking spec that has been added to World of Warcraft, and discuss how Weak Auras and UI elements can turn your play from misinformed to GODLIKE!
The first thing everyone needs to understand is just how many buffs and debuffs this spec plays around. While this isn’t a “from the ground up” guide on the spec, I will certainly take some time to help people understand that if you are seeing anything we discuss in this article for the first time, you want to read more into it. Things like Stagger and Guard, or monitoring Shuffle are supremely important to the spec’s longevity, so be sure you understand exactly how each works beforehand.
To preface this, my first Challenge Mode 9/9 gold set was completed on my Brewmaster Monk, BEFORE I learned about the UI elements we will discuss today. I was completely in the dark, and while I had a small addon to monitor cooldowns, I basically was playing blind and just using things as they became available. Ever since learning these tricks, I have easily doubled my success as a Brewmaster tank, and will do what I can to pass this knowledge on to you.
Here is a full UI screenshot of the set up I am currently running. It may all look rather confusing, so don’t worry, we will break it down piece by piece.

Click to Enlarge!
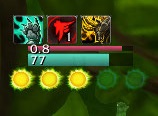
Stagger –
The stagger indicator is EASILY the most important part of this entire set up, and will be your best friend, especially in five man content with 10-20 mobs attacking you at once. This indicator will show you exactly what level your stagger is, as well as a percentage-based indicator. As the correlated color scheme gets further progressed, the Weak Aura visual indicator will go from see-through to opaque. Having the percentage based indicator is really the key part, and without such, we would be misinformed about when to clear, as the default Blizzard aura only shows past Red stagger. Its important to also remember that with this indicator you can monitor how dramatically your stagger is increasing, allowing you to make an on-the-fly decision about spending on its clear. Here is an example of the indicator in game, isolated.  To add this element, follow this link.
Copy/paste the text into the “Import” section and it will automatically appear on your screen in the same position I have it!
Shuffle –
If the Stagger indicator is the bread, the Shuffle indicator is the butter, as the two go hand in hand. As this is your light active mitigation, its very important you know EXACTLY when your shuffle is expiring, and without it maximized properly on bigger pulls, you can easily find yourself dead within a few globals. This element will help you know firstly when you do not have it up, and then how long its duration is so you can anticipate spending for another blackout kick.

Nul Indicator
-

Time remaining.
- Time remaining.
Import string for this indicator can be found here.
Guard –
The next most important element you could have would be a Guard indicator, which not only displays when its active, but will display when it is available, its CD, and how much it will absorb. Guard is your primary active mitigation and will essentially act as your only real means for surviving regular sources of damage. This is one of the biggest downfalls to Brewmaster tanks, the fact that they have no real on-demand reduction on a small CD, so you really need to be able to use this ability to its full potential. In Challenge Modes, use it as your first line of defense to dampen the huge incoming burst from the synced swing timers. In raids, build it up and use it exactly when a big hit is coming. Make sure its empowered with Tiger Palm as well!


With this indicator you see when its available on top, and the duration / amount absorbed below. Find the import string at this link.
Elusive Brew –
Another huge part of the active mitigation game for Brewmasters, Elusive Brew can be a godsend or it can be useless. The issue is in raids, a lot of big damage simply can not be dodged, rendering everything but guard and stagger useless in mitigating it. Either way, proper usage of this ability will be vital to your survival in those short-burst 20+ packs of Challenge Modes. With that many mobs attacking you, the “second” based duration really amplifies its usefulness, and if not used correctly could be the reason you win or lose. I feel around 6 stacks is when you want to use this ability, but it also depends on the situation and incoming damage expected, so with this string you can easily monitor how many stacks, and then its CD.

Find the information you seek here.
Basic Buff and Resource Cluster –
While less intricate than the previously discussed topics, this cluster of indicators will be just as important for basic usage of the class mechanics. Below, you will see a Chi indicator, an Energy indicator, and some basic buff trackers. Starting from the top, the buffs include Tiger Palm and Ox statue, which are vital to the spec’s play, but may not be the reason you die or live. Down the next level, we see a red bar and a green bar. The green is your current energy bar, and the red is the CD of Keg Smash – the most important ability in Monk tanking. Without question, if you can not maximize your keg smash usage you will not succeed, as it not only does the most damage, but generates the most chi per global, applies weakened blows, and Dizzying Haze which snares and mitigates. The final bar is the Chi bar, which will become your best friend in times of high spending and times of building.
While I call it a cluster, its actually three groups all stacked up. You can find the import strings as follows:
Buff Notice Bar.
Energy / Keg Indicator.
Chi Visual Updater.
Self Heals –
Reduction isn’t a Monk’s only tool, and some times self heals can be more useful than actual mitigation. Either way, its important to use Expel Harm as much as possible, and then use your Level 30 talent as needed. These two indicators are as basic as it gets, showing the availability and CD of which ever talent you have, as well as Expel Harm.

Big CD Tracker –
If you are going to play a Tank, I feel you shouldn’t need something like this, but either way its useful as you learn. Your big CD, aka “Shield Wall” should be ingrained in your mind and you should be able to tell real-time when its available. For those still getting used to this, try this handy-dandy thing.  Dampen Harm or Diffuse Magic will change based on selection. Find it here.
Vengeance –
Last but not least, a small string for Vengeance tracking. This may not be incredibly useful, but in Challenge modes, its important to monitor how much you have and get creative with taking damage to try and increase your output. This is high-risk/high-reward, so its best if you move this tracker to the most comfortable area for you.
Well that’s everything, so if you have any questions, feel free to leave them in the forum attached to this topic, or contact me in game.
As always, I am not fluent in the program, and usually find people who ARE fluent and modify their work. The original source of this came from Sunnier.
Check out Sunnier’s blog, as they deserve the credit for the foundation. I only put my touch on it and delivered it to you!
More so, this is an important matter to realize, as the goal here is to be able to play a class to a higher level just by using Addons that give you the information you need. You can literally go from never tanking before as a Monk to knowing exactly what you need to do with the right tools, so I hope this has helped.
Discuss this set up here:
Stratics Forums!
See the set-up in action:
https://www.youtube.com/watch?v=ZBxVnfe8bEs
Check out my Monk’s Armory:
http://us.battle.net/wow/en/character/Firetree/Metromonk/advanced
Download Weak Auras Two:
http://www.curse.com/addons/wow/weakauras-2
Recent Comments